You can Add Students and Guardians in DreamClass manually, through bulk import, or by using online admissions forms. Each method creates structured student profiles that connect attendance, grades, tuition tracking, and parent access in one centralized system, similar to a modern student information system.
To Add Students and Guardians means creating a linked student profile and family account inside your school management system so attendance, grades, communication, and billing stay connected from day one.
When schools add Students and Guardians correctly from the start, everything else works better. Attendance tracking flows into reports, grades calculate properly, and tuition tracking stays accurate. You can add Students and Guardians in three simple ways: manually, through bulk import, or via online admissions forms. The right method depends on your school size, workflow, and enrollment stage.
Whether you run a private school, a new K-12 school, a vocational school, a homeschool collective, or a growing training institute, learning how to add Students and Guardians the right way gives you a clean operational foundation. Based on real onboarding experience, with schools transitioning from spreadsheets and paper files, this early setup step prevents most reporting and record issues later.
How Do You Add Students and Guardians Manually?
If you are enrolling one student at a time, the manual method is often the fastest way to Add Students and Guardians.
First, navigate to the Students section and select create a new profile. Enter the required information such as first and last name. Then, add optional details like date of birth, level, or contact information. Once you save it, the profile becomes the student’s central record.
From this single profile, you can manage several core actions that support daily operations.
- Edit personal and contact details
- Upload required documents
- Add internal notes for staff
- Enable portal access for the student
Because everything stays in one organized place, you avoid scattered spreadsheets and disconnected tools. After creating the student profile, you can create or link a Guardian profile. This step ensures families can log in, review progress, and stay informed without calling the office.
Manual entry works best for schools enrolling a few students at a time. For example, new private school founders who are replacing paper files often prefer this approach. Similarly, homeschool collectives adding families mid term may find it more practical than preparing a full import file.
▶️ Watch the video:
0:01 Let’s see how you can add students into your DreamClass account. There are three ways to do so. One is by going to Students.
0:10 Click Create a student and simply fill in the first name, last name, which are the mandatory fields. And the email or a level should you wish to.
0:20 Click Save. And you will notice that the student has been created. You can click to get inside the student’s profile and simply edit the rest of the information should you wish to.
0:35 If you want to give access to the student, you can do it directly from here by clicking Access Disabled, Enable DreamClass Access, set up your username, a password, and then confirm the password.
0:47 Now you can click Save. And as you can see, the student has now received an email that their account has been activated.
0:58 Another way to add students to DreamClass is by going to students, bulk actions, and actions. Thank you for watching, and I’ll see you in the next video.
1:04 And click to import students.
1:07 This is a toaster process. You need to firstly download the template file and fill in the related information. The template looks like this.
1:16 There are information about the students and then information about the cardients. If you do not use cardients, then simply ignore and leave this blank.
1:27 What you have to do is that you can start putting the information about the student that you would like to import.
1:32 Let’s see an example. So let’s say that I would like to add into the system George with last name light with this birthday and this email address that lives here and with Nick light as the father with email being this one.
1:54 The relation appears here. Make sure that the date of birth aligns with the date of birth that you have selected if you go to your school settings local date format.
2:09 To complete your importing, go to bulk actions and on step two, click this leader icon. Select the file and hit import.
2:24 Now the import was successful. And you can see it from the automatic response that this was a successful import. Now, if you go to your students list, you will notice that we have George, light right here.
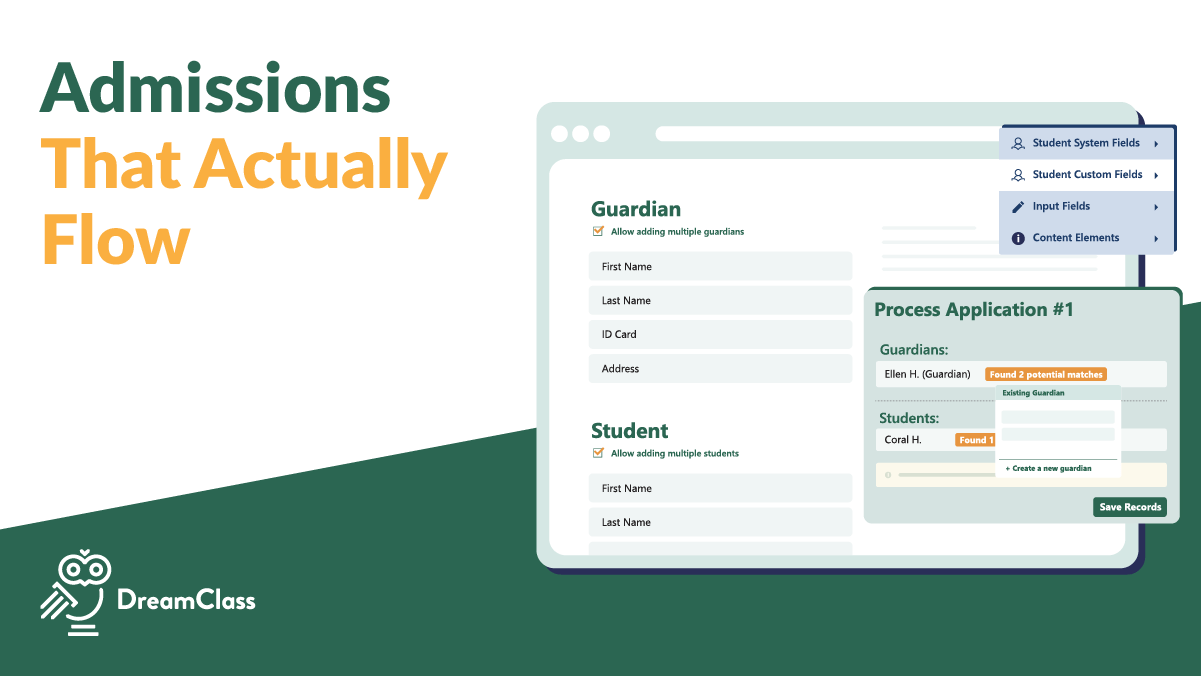
2:37 And if I go inside George, I can see that Nick Light, George’s file. Father has also been created. The third way to add someone, um, as a student or a guardian to your DreamClass account is through the admissions.
2:54 So go to the admissions. I have already created the registration admission right here. If you click edit and preview, you will notice that the admission form includes information about the parent and about the student.
3:08 After a complete information for the parent and for the student, I click submit. Now in my submissions, I have Jonathan, who is a guardian.
3:28 I can click create guardian. And just create, uh, the instance right here. As you will notice from, um, the notification, I already have someone named Maurice.
3:40 But because I know that they are not related, I will not override this information. I will simply create a new instance.
3:47 After I create the guardian, I can see the information for the student, and now I can click to create the student as well.
3:56 Now, if I go to the student list right here, I can find, Nicky Morris, going to Nicky Morris’s account, and I can see Jonathan Morris, the father that has already been created as well.
4:12 In order to give access to students and guardians, you can do this either by selecting one by one, and I’ll see you in the next one. The students clicking access enable, defining a username, a password, then confirming the password, or going to bulk actions, drinkless access for students, select the
4:30 student or students, click, update access and enable. The same you can do for the guardians as well. You can either go one by one, click access enable, set up a username and a password, or you can go to bulk actions, drinkless access for guardians, select the guardian or all of the guardians, click update
4:53 access, enable and simply give them access to join the platform.
When Should You Import to Add Students and Guardians in Bulk?
If you are onboarding an entire class or migrating from spreadsheets, bulk import is the most efficient way to Add Students and Guardians.
Start by downloading the official student import template available on the Student screen. Then, fill in each row with student details and corresponding guardian information. Make sure your date formats match your school settings before uploading. After that, go to bulk actions and upload the completed file.
The template allows you to centralize enrollment in one structured process.
- Add multiple students at once
- Include guardian names and relationships
- Predefine contact information
- Reduce repetitive manual entry
As a result, student and guardian profiles are automatically created and linked. Therefore, administrators save hours of repetitive setup work. This method is especially useful at the beginning of a new academic year, during school launch, or when transitioning from legacy systems.
Can Admission Forms Automatically Add Students and Guardians?
Yes, admission forms provide the most scalable way to add Students and Guardians.
Instead of typing information yourself, families submit their details through customizable online forms. These forms can collect student information, guardian contact details, course selections, and required documentation. Once an application is submitted, administrators review it and convert it into active student and guardian profiles.
This workflow reduces manual typing and minimizes data errors. In addition, it creates a professional enrollment experience that builds trust with families. New schools that want structured online sign ups often rely on this method from day one.
Which Method Should You Use to Add Students and Guardians?
Here is a quick comparison to help you decide:
| Method | Best For | Speed | Automation Level |
|---|---|---|---|
| Manual Entry | Fewer than 5 students | Fast | Low |
| Bulk Import | Spreadsheet migration or new term setup | Very Fast | Medium |
| Admissions Forms | Ongoing enrollment and online sign-ups | Automated | High |
In other words, your enrollment stage determines the right approach.
Choosing the right method to add Students and Guardians depends on your situation.
If you are enrolling fewer than five students, manual entry keeps things simple. However, if you are migrating dozens of records, bulk import prevents unnecessary duplication of effort. Meanwhile, if you are launching open enrollment, admissions forms streamline the entire onboarding journey.
Most schools start manually, then move to import or admissions as they grow. In the long run, structured enrollment prevents reporting issues and duplicate records.
What Happens After You Add Students and Guardians?
After you Add Students and Guardians, you can enable portal access using role-based access controls individually or in bulk. Once activated, students gain access to schedules, attendance records, grades, and invoices. At the same time, guardians can log in to track progress, review attendance, and communicate with teachers.
Proper setup affects the rest of your system in measurable ways.
- Attendance tracking connects directly to student profiles
- Gradebooks calculate results based on active enrollments
- Tuition tracking links invoices to the correct family
- Report cards and transcripts pull structured data automatically
Because these systems depend on accurate profiles, early precision prevents later corrections. In other words, enrollment is not just data entry. It is the operational backbone of your school.
When you add Students and Guardians correctly:
- Attendance connects automatically to each student profile.
- Gradebooks calculate results based on active enrollments.
- Tuition tracking links invoices to the correct family.
- Reports and transcripts export cleanly for meetings; even for state files, or accreditation.
As a result, administrators spend less time fixing errors and more time supporting students.
How Can You Prevent Duplicate Records When You Add Students And Guardians?
Duplicate entries usually happen during imports or re-enrollments. Therefore, always review existing profiles before uploading new data. If a guardian email already exists, confirm whether the account should be linked, rather than recreated.
In cases where duplicates appear, administrators can merge profiles to maintain clean records. Consequently, your attendance history, financial data, and academic records remain intact. Clean data supports compliance, accurate reporting and long term scalability.
Why Is It Critical To Add Students And Guardians Correctly From The Start?
Many schools underestimate this step. However, improperly structured records create problems later in attendance summaries, tuition tracking, and transcript generation. On the other hand, when you add Students and Guardians correctly, reporting becomes simple and transparent.
Private schools gain clarity and control. New founders reduce spreadsheet chaos. Homeschool collectives produce official looking records. Training institutes maintain structured student profiles ready for export and compliance.
In short, correct enrollment creates operational confidence.
In Short: What Is The Best Way To Add Students And Guardians?
The best way to add Students and Guardians depends on your enrollment volume and workflow. Manual entry works well for small, steady growth. Bulk import is ideal when migrating data or starting a new term. Admissions forms provide the most automation for ongoing sign-ups. However, in every case, accurate profile setup ensures attendance, grades, billing, and communication remain connected.
Ready To Add Students And Guardians With Confidence?
If you are still juggling spreadsheets, paper forms, and email threads, this is the moment to simplify your workflow. Instead of patching tools together, centralize everything in one organized platform.
Set up your structure once, then let the system handle attendance, grading, tuition tracking, and communication.
Start your setup today and see how easy it is to Add Students and Guardians inside a unified school management system.
Or, if you prefer to explore first, start your free trial and test the process with your own students. No complex onboarding. No IT department required. Just a clear path from enrollment to daily operations.
Related Reads
Explore more practical guides to simplify school operations:
FAQ
Frequently Asked Questions
Can I edit a student or guardian profile after creating it?
Yes. You can update names, contact details, levels, and linked guardians at any time. This flexibility helps prevent errors from becoming long-term record issues and ensures attendance, grades, and tuition data stay accurate.
What if I already have my students in spreadsheets?
You can use bulk import to upload multiple students and guardians at once. Simply format your data using the provided template, upload it, and the system will automatically create and link the profiles.
How do I avoid duplicate student or guardian records?
Before creating or importing profiles, check whether the email or student record already exists. If duplicates appear, administrators can merge profiles to maintain clean academic, attendance, and financial records.
Can parents and guardians see everything immediately?
Portal access can be enabled individually or in bulk. You control what families can access, including schedules, attendance, grades, invoices, and communication updates.
Can I add students mid-year or after the term starts?
Yes. Students and guardians can be added at any time. Once enrolled, their profiles connect to active classes, attendance tracking, grading, and billing without disrupting existing records.